Tuesday, November 19, 2013

DIY: Distressed Steel Painted Coffee Table

Living in my shoebox apartment for almost two years now has made me a pro at transforming thrifted finds and leftover supplies into something stylish (and budget-friendly!). I mean, who needs a giant space when you can get creative, right?

My latest project tackled a tired zebra-print ottoman that was begging for retirement. Reupholstering could have worked, but this time, I craved an industrial vibe. Enter the world of online browsing, where I stumbled upon a gorgeous distressed steel table.  😍 Except, the price tag?

Inspiration Table: by Made by John-Patrick Mcchesney


Challenge accepted! Inspired by the beauty (and hefty cost) of this table I decided to create my own version.

Craigslist Savior:

First stop: Craigslist. Scored a beat-up steel table practically begging for a makeover. Immediate delivery, please! Next, a few trips to my local hardware store, and I was armed and ready for some DIY magic.

The Makeover Magic:

Stay tuned for the next post, where I'll walk you through the process of transforming this rusty relic into a stunning industrial coffee table with layers of paint, a touch of distressing, and a glossy finish. Spoiler alert: it won't cost you an arm and a leg!

The Process: Painting layers, Distressing and Gloss:


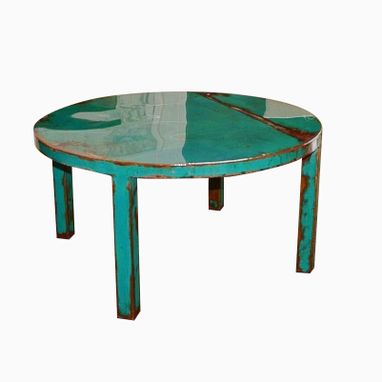
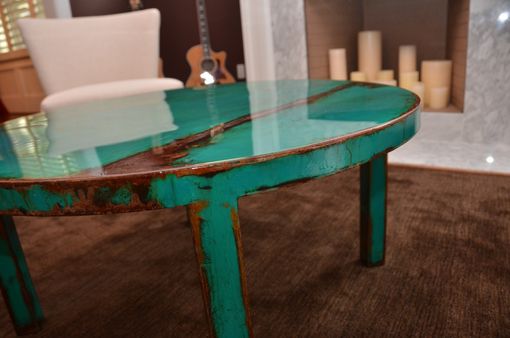
Fast forward to a fun (and slightly messy) afternoon of painting, distressing, and adding a touch of shine, and this beauty was born!

The best part? The total cost was around $50, including the table itself, supplies, and a few trips for coffee breaks (hey, a creative mind needs fuel!).

Now, I gotta confess, the finished product turned out so incredible, it sparked a little something inside me. Maybe media planning wasn't my one true calling after all? This little DIY project had me seriously considering a whole new career path in furniture flipping.

Long story short, I listed the table online and...well, let's just say it sold faster than you can say "industrial chic." For a cool $500 profit! Not bad for a weekend project, right?

The moral of the story? A little creativity, some elbow grease, and a Craigslist score can turn into something truly amazing. Plus, who knows? You might just discover a hidden talent for transforming trash into treasure (and maybe even a new side hustle). Stay tuned for more adventures in DIY furniture flipping – your next statement piece might be just a dumpster dive away!


Sunday, June 23, 2013

DIY: Ripped Magazine Art

In highschool, I had an art assignment which involved ripping up small pieces of magazines and creating a larger composition based on the ripped up pieces. After I graduated college, I found the piece in my parents attic, framed it and brought it to NYC.

Highschool Collage:

I always liked the collage technique, so when I found a gaudy Christmas coffee-table tray at my parents house 2 years ago, I decided to remove the Christmas picture backing from the underglass. The glass gave my chosen ripped-up magazines pattern a fuzzy look which I adore!


Which leads me to my FINAL collage project I'll hopefully ever do. This piece is 3 feet by 7 feet and takes up a large portion of my wall. This project technically is only 80% done as I really should remove the glass and work on the body shading. That, however, will probably never happen, for as I stare at it now- I'm so over it. Ugh, too much additional color in my apartment.


Friday, January 27, 2012

DIY: Pipe Shelves

On the 1st of this year I moved into my very first ONE-BEDROOM apartment in Manhattan. For those of you who don't understand the excitement of that mere statement, simply scroll down to see the pictures. But for the rest of you, picture if you will two rooms likely equaling less than 300 square feet. Now, granted this is more space than I have had to myself in the last 4 years of room-mate living, but still, I knew I was going to have to get creative with my spacial design and storage


Approximately a month prior to my big move, I headed to the internet for inspiration ideas.  Apartment Therapy was my first destination. For those of you who aren't familiar with the website it contains a fabulous montage of decorating ideas. I came across 2011 Small Cool Contest which contained numerous apartment inspirations for spaces under 400 sq ft. *Jackpot* (If you're like me you'll want to check out '10's/ '09's). Upon my search I found myself scanning through countless blogs, but halted my mouse clicks when I saw this number:

Apparently, these galvanized plumbing pipe custom shelving units were first done by the Ace Hotel Then The Brick House figured it out for the masses, my simplistic DIY inspiration Manhattan Nest did it....and after googling, I found countless other variations of the unit. Cut to: as a true DIYer from a young age, I knew these shelves NEEDED to be in my new ONE-BEDROOM apartment.  

...and with the help of my sister and mother, the shelves started to come to life. 


I just finished getting some of my junk on the shelves and I LOVE it, but I feel they look a bit cluttered. I'll probably redecorate often to keep it looking fresh. 

Few notes:
  • I stained only one side of each pine plank because my mom had to head back to Massachusetts and wanted to see the 'big picture' so I stained the flip side when the unit was put together.
  • Brick House cost came to $200. I went to multiple hardware/lumber stores costing piping and wood-I have no idea how Brick did it for that cheap. I would say expect to pay nearly double that.
  • I did my calculations maybe 20 times, but I still encountered problems with sloping ceilings and the plumbing pipes not 'threading' into each other to create level boards. Feel free to e-mail me for specific tips! 


- New apartment: check
- New 'custom shelves': check
- 100 more DIY projects: uncheck  

Wednesday, December 28, 2011

Pipe Shelves!

Countless hours calculating and scouting materials costs, I decided the first addition to my new apartment would be 'custom shelves'. Stay tuned!

Friday, March 18, 2011

DIY: Jewelry

Every now and then, I stumble upon something in a store or a magazine that catches my eye, and I think to myself, "I bet I can make that myself." In my mind, I'm a DIY enthusiast, despite having limited experience in completing projects from start to finish. Whether it's bed headboards, jewelry, or artwork, I've dabbled in them all, rarely achieving a result that truly satisfies me. So, here I am, embarking on my next mission: to actually complete something and genuinely love it.

Let me take you back to a past DIY endeavor. Every year, my family and I vacation in Maine. A few years ago, I stumbled upon a quaint seaside boutique showcasing the most exquisite sea foam/teal and gold bracelet. I envisioned it adorning my wrist, complementing many of my Spring/Summer outfits perfectly. Then I glanced at the price tag – a staggering $475. Ouch. But rather than splurging, I opted for a more introverted approach. I pulled out my reflective journal and sketched a picture of the bracelet.

A week later, back in NYC, armed with cash and determination, I ventured to the Fashion District, home to numerous bead, button, and jewel stores. After a $30 shopping spree for gold chains, loops, hooks, stones, and armed with my bracelet sketch, I returned to my apartment ready to bring my vision to life. Fast forward to March 18th, 2011 – an unusually warm day for March, with temperatures hitting 70 degrees. As I opened my under bed storage, a plethora of half-finished DIY projects stared back at me. Among them lay the 95% complete bracelet – gems still glittering, gold-plated stainless steel chain still shining. However, it remained unwearable. I hadn't figured out a way to secure the gems without a soldering tool, and the protruding gold sticks made wearing it uncomfortable. Ouch, indeed.

So, as I prepare for my Spring/Summer '11 ensembles, my mission for the next month is clear: to finally finish the bracelet and check a DIY project off my list once and for all!


Tuesday, March 1, 2011

those friends....

So, I'm in my late twenties now. Yep, just this past Sunday, I made that jump from a bright-eyed 25-year-old to feeling like, "I'm too old for this," with hangovers that linger for an eternity, realizing I can't party like a 21-year-old anymore – I'm a 26-year-old woman now. Ugh.

But despite the aging pains, I had my study abroad crew in town last weekend to celebrate my birthday, and of course, it turned into a full-blown party weekend. Having them around brought back waves of nostalgia from nearly five years ago when we first met during our Australian study abroad adventure. Back then, we were wild, carefree, and brimming with excitement for our futures.


I used to be afraid of so many things, that I'd never grow up, that I'd be trapped in the same place for all eternity, that my dreams would forever be shy of my reach. It's true what they say, time plays tricks on you. One day you're dreaming, the next your dream has become your reality.

And now that the scared little girl no longer follows me wherever I go, I miss her. I do. Because there are things that I want to tell her, to relax, to lighten up, that it is all going to be okay. I want her to know that meeting people who like you, who understand you, who actually accept you for who you are will become an increasingly rare occurrence.

W & B, these people who contributed to who I am, they are with me wherever I go. And as history gets rewritten in small ways with each passing day, my love for them only grows, because the truth is it was the best of times. Mistakes were made, hearts were broken, harsh lessons learned, but all that has receded into fond memory now.

How does it happen? Why are we so quick to forget the bad and romanticize the good? Maybe it's because we need to believe that the time we spent together actually meant something. That we were there for each other in a time in our lives that defined us all. That time in our lives that we will never forget.

I can't swear that's exactly how it happened. But this is how it felt.